Node.js常见的使用小技巧
1、替换了redis的值没有生效
想替换 redis 的值,需要先删除后再设置,否则不会覆盖;并且 ttl 必须是整数,不能有小数点,否则报错
2、nodejs 在 windows 下的路径和 mac 下的路径解析问题
可以使用 path.join 进行连接;
3、针对单个项目使用 npm 配置
在项目根目录创建 .npmrc 文件重写部分配置即可,其他的项目不受影响
registry=https://registry.npmmirror.com
4、npm install 报错,提示包下载失败
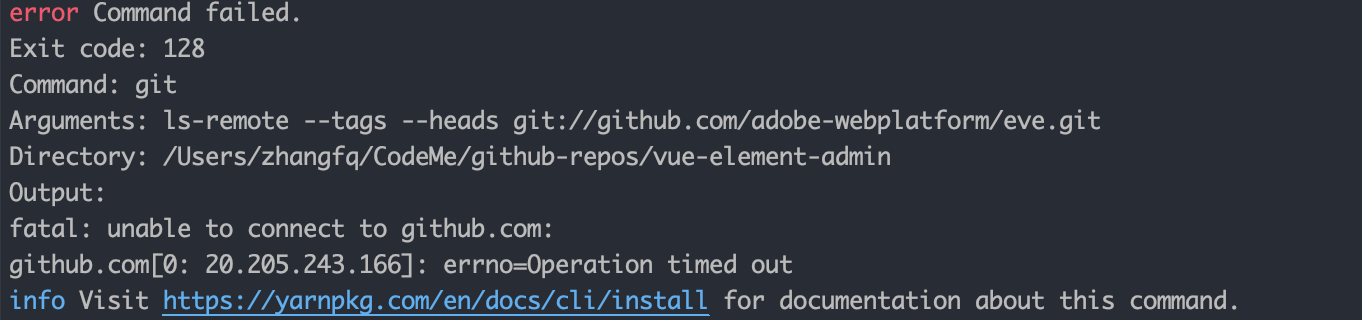
git config --global url."https://".insteadOf git://
5、npm install 多个包的版本
查看:https://docs.npmjs.com/cli/v9/commands/npm-install
npm install <alias>@npm:<name>
使用别名安装软件包,允许多个版本的同名包同时安装,为具有较长的包更方便导入名称,别名仅适用于项目,不会重命名传递依赖项中的包。npm install my-react@npm :react npm install jquery2@npm : jquery@2 npm install jquery3@npm : jquery@3 npm install antd4@npm : antd@4.19.5
6、启动一个随机的端口号的服务器
  var server  = http.createServer();

  server.listen(0);
  server.on('listening', function() {
    var port = server.address().port
  });
  // 监听 0 端口,nodejs会自动分配给你一个可用端口,listening中获取port就ok了。。就这么简单。
7、axios 的 https 证书过期了解决方案
https 证书过期之后,axios 请求的时候会报错,nodejs 程序可以使用下面的方式跳过 https 证书的校验;
const axios = require('axios');
const https = require('https');

axios.defaults.httpsAgent = new https.Agent({
  rejectUnauthorized: false
});
重新调用之后就没有问题了;
8、删除 require 的模块的缓存
如果这个模块是动态模块(模块的内容可能会变化),需要使用完成后删除,下次使用的时候再重新加载,nodejs 删除缓存的模块,查看 require使用说明。
const tempFile = "./temp.js";
const tempFn = require(tempFile);
// 删除缓存
require.cache[require.resolve(tempFile)] = undefined;
// delete require.cache[require.resolve(tempFile)]
// tempFn 注意删除了缓存,在这里执行还是可以的,下次引入文件的时候会自动加载
tempFn();
Modules: CommonJS modules | Node.js v20.2.0 Documentation
require.cache 存储了已经 require 过的模块,可以通过删除缓存的 key 来让 nodejs 下次加载的时候重新加载该模块(这个方法会 native 模块不生效),如果模块修改了,那重新加载会得到修改后的模块的内容,适合热加载模块的场景。
Modules are cached in this object when they are required. By deleting a key value from this object, the next
requirewill reload the module. This does not apply to native addons, for which reloading will result in an error.
9、业务代码中npm install后启动项目仍然报错
在业务代码中使用的依赖一定要放到 dependences 中,否则设置 NODE_ENV=production 后,执行 npm install 安装不会报错,但是项目启动就报错了,提示缺少依赖。
10、加载多个env文件到process.env
有些项目使用多个env文件来控制整个项目运行的环境变量的,所以会有环境变量叠加的场景,例如:
- 本地环境 .env + .env.development + .env.local
- 测试环境 .env + .env.test
- 正式环境 .env + .env.production
以上情况,需要将 .env 作为最基础的环境变量,根据不同的环境来覆盖部分环境变量实现环境的切换,这里就需要用到一个包 dotenv和dotenv-expand,使用实例如下所示:
const envFiles = [".env.production", ".env"];
const dotenv = require("dotenv");
const dotenvExpand = require("dotenv-expand");
envFiles.forEach((envFile) => {
    dotenvExpand.expand(
        dotenv.config({
            path: envFile,
        })
    );
});
11、高版本的nodejs不支持tls1.3导致运行报错
在Node.js 20环境下,错误信息如下
Error: error:0308010C:digital envelope routines::unsupported
是因为高版本的nodejs不支持tls1.3,需要设置环境变量即可。
export NODE_OPTIONS=--openssl-legacy-provider
或者在运行之前在命令行内添加变量,如下。
NODE_OPTIONS=--openssl-legacy-provider node xxx.js
如果你常用的就是高版本的nodejs,可以将NODE_OPTIONS直接写在zshrc或者bashrc中,如果要使用低版本的nodejs,需要在命令行或者当前的shell中将NODE_OPTIONS设置为空。
export NODE_OPTIONS=""
12、Node.js解析合并多个env文件
使用到的包:
- dotenv
- dotenv-expand
代码如下,会将 .env.production 和 .env 的环境变量进行合并覆盖:
const envFiles = [".env.production", ".env"];
const dotenv = require("dotenv");
const dotenvExpand = require("dotenv-expand");
envFiles.forEach((envFile) => {
  dotenvExpand.expand(
    dotenv.config({
      path: envFile,
    })
  );
});